DIY - Fitting heated seats your gen1/2 Coupe
If you'd like a warm rear, then this is the mod for you.
Many thanks to Patrick, his webpage is included below. http://www.uhter.de/DIY/en/seatheater.html
This mod can be discussed in the DIY section of the forum
Add on seat heater installation:
Duration:
- approx. 1h each seat
- approx. 1h wiring
Needed materials:
- Waeco Magic Heat add on seat heater from Conrad Electronic (no. 853140-13), 99,95 EUR
- Seat heater switch from Hyundai dealer (no. 93332-27000), 15,30 EUR
- Seat heater switch from Hyundai dealer (no. 93333-27000), 15,30 EUR
- Switch housing from Hyundai dealer (no. 93331-27000), 1,90 EUR
- 34 strong cable ties
- 12mm wrench
- 14mm wrench
- Screw driver
- Pliers or edge cutter
- Perhaps needle-nosed pliers
- Perhaps adhesive tape
Preface:
- I do not guarantee for any information in this document. Any installations you perform you do at your own risk.
- First read the whole text an then start to do anything.
- CAUTION: Many parts at the seats are extremly sharp. Watch out not to cut yourself.
Taking out the seats:
-
The seats are fixed with 4 14mm screws. These are coverd by plastic caps which clasp themselves from the side on the mounting. So try to under-lever and press apart. Unfortunately I broke three of the caps.

The seats:
-
Screw off the seat cushion (4 12mm screws).

- Untighten the covering cloth at the rear side and to the left and right.
-
Bend away the small sheet metal flaps.

-
Pull up the covering cloth (a plastic band is sewed to the border), the covering is attached with metal filaments to the seat cushion.

-
Cut off the metal rings with some pliers, now the covering can be taken off.
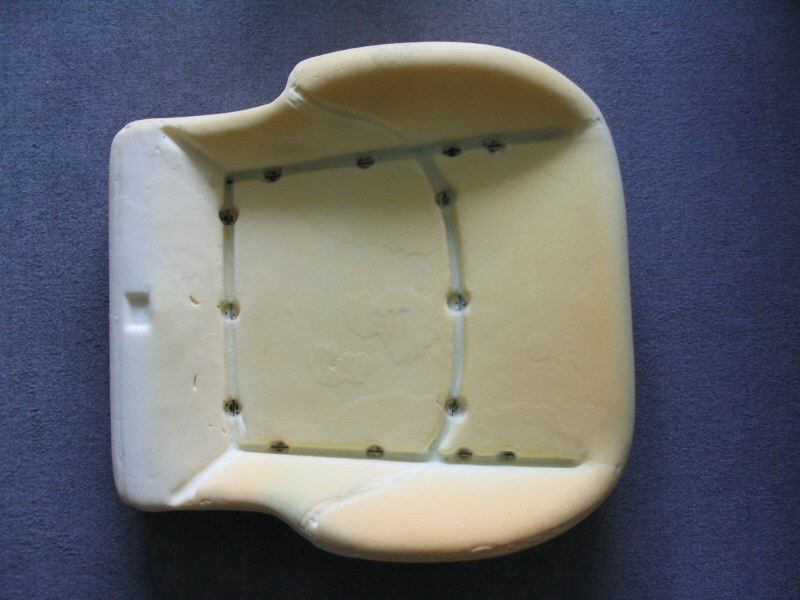

-
Insert cable ties to the places where the metal rings have been. You can grip the ends easier with some needle-nosed pliers.

- Stick on the seat heater.
-
The protection film of the sticky pads can be taken off easier if you stick a piece of adhesive tape onto it and tear it up.

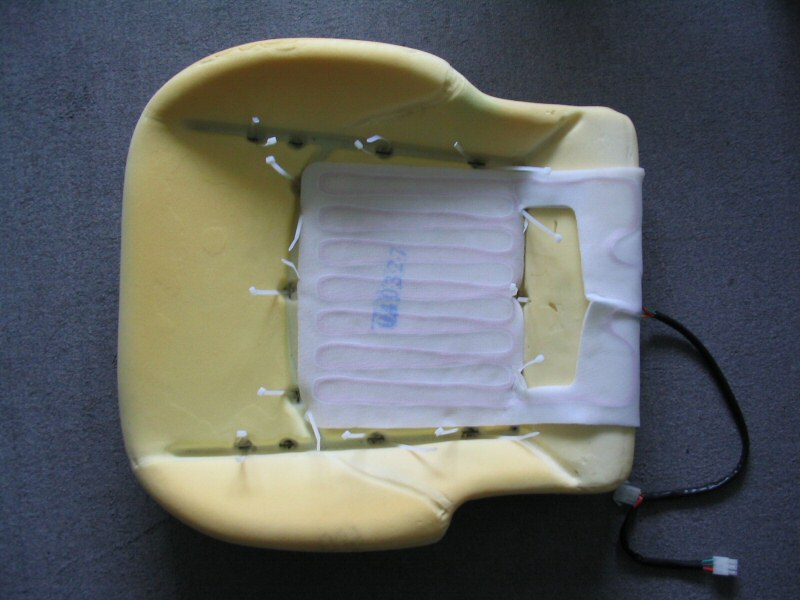
- Re-fit the covering cloth and tighten it with the cable ties. Cut off the remainig long ends.
- Let the cable exit the covering cloth at the side which does not face the doors when the seat is back in the car so they can't be seen when the doors are open.
- Pull down the covering cloth and tighten it at the rear side and to the left and right. Bend the small sheet metal flaps back.
Backrest:
- Take off the head rest (pull the little lever) and place the remaining seat with the backrest on the floor and the mounting on a table or something like this.
-
Cut off the 5 metal rings at the bottom of the backrest. ATTENTION: two of them (the last but one from each side) are no rings but hooks and shouldn't be cut. They hold some strings under the covering cloth.

- Remove the protection film of the lower sticky pad and insert the seat heater as deep down as you can.
- Stick on the upper adhesive pads.
- And again let the cable exit the covering cloth at the side which does not face the doors when the seat is back in the car.
- Close the covering cloth with cable ties. I prefered to place the cable ties the way shown on the photo because the lock can't be seen but it can be pushed with the fingers to the metal cross-tie so you can insert the other end easily.


Now screw on the seat cushion and reinstall the seat into the car.
Wiring:
Because I didn't want to change (destroy) neither the wiring of the car nor the seat heater, I decided to build a connecting cable from the wiring belonging to the add on seat heater. If you don't want to do this you can cut off any sockets and connect them with insulating screw joints. The original Hyundai switches are on-off swiches and the seat heater can be switched to two heat levels. So you do not need the white cable and solder the blue one and the brown one to electric plugs. Cover them with plastic caps.
Plug the two electric plugs into the socket coming out of the carpet under the seat. The polarity doesn't matter.

Now move the seat as far to the rear as it can und fix the dangling wires with cable ties. So nobody can tear them off with the feet while sitting at the rear seats.
Pull out the little black tray next to the handbrake lever. Just grap it with the hand and pull. Do the same with the gear lever cover. Just grap the cover where the gaiter is an pull firmly. The cover is attached with three clamps and two hooks. Perhaps it's better if you pull to the right and to the front at the same time but I usually pull upwards like a maniac.


Search for the two plugs and put them though the hole from the tray. Assemble the switches and insert the plugs. White is for the left seat, blue for the right. Hopefully for right hand driven cars this isn't the other way around. So you better try it before you press the switches into the board.


